Development:
- Role: Game Designer
- Engine: Unity
- Team Size: 8
- Duration 4 Months
For my Capstone project I worked remotely with a team of designers and artists to create Trial of Passage, a 3d Adventure Platformer with some Legend of Zelda inspirations.
Design
- Created and iterated on player avatar actions, controls, and camera modes from conception to game release.
- Designed 3 of the game’s levels in the Unity Game Engine, scripting unique interactions and mechanics to drive player engagement.
- Iterated on design by incorporating playtesting feedback.
Implementation
- Created a template for designing the game’s enemies through class inheritance & a simple state machine to improve workflow.
- Implemented models and animations through Unity’s Animation State Machine and scripting in C#.
- Created a checkpoint and simple save system with C# to save and load player inventory and upgrades.
- Used Perforce for version control.
- Maintained a bug log with weekly sweeps to diagnose and fix game bugs.
Teamwork & Communication
- Led the remote coordination between the Design and Art team using Discord for communication and Trello for project management.
- Coordinated with a team of designers to integrate levels and balance progression.
- Worked as part of a team to iterate on game designs by parsing player feedback, discussing goals, and planning sprints with a clear vision for the project.
Table of Contents
- Level Design – A quick breakdown and playthrough videos of the levels I designed.
- System Design – A look at a few of the systems I designed and problems I solved.
- Agile Development – Our planning documents for 2-week long sprints.
- Play The Game!
- Team Credits
Level Design
The levels in Trial of Passage are intended as proof of fun as much as anything else. Taking inspiration from The Legend of Zelda, we decided that each of us would create one or more levels focusing on one particular aspect of the game, mine was the bomb. Not a very subtle problem solving mechanic, but I thought it lent itself well to a sort of volcano theme and I knew I could have a lot of fun with that. The inclusion of lava in the levels would also give me a great opportunity to test the player’s platforming abilities.
Trial of Ashes
In the first of my levels I introduce animated tiles that will collapse into lava a couple seconds after the player steps on them, and then alternate between combat challenges on those unstable floors, and platforming.

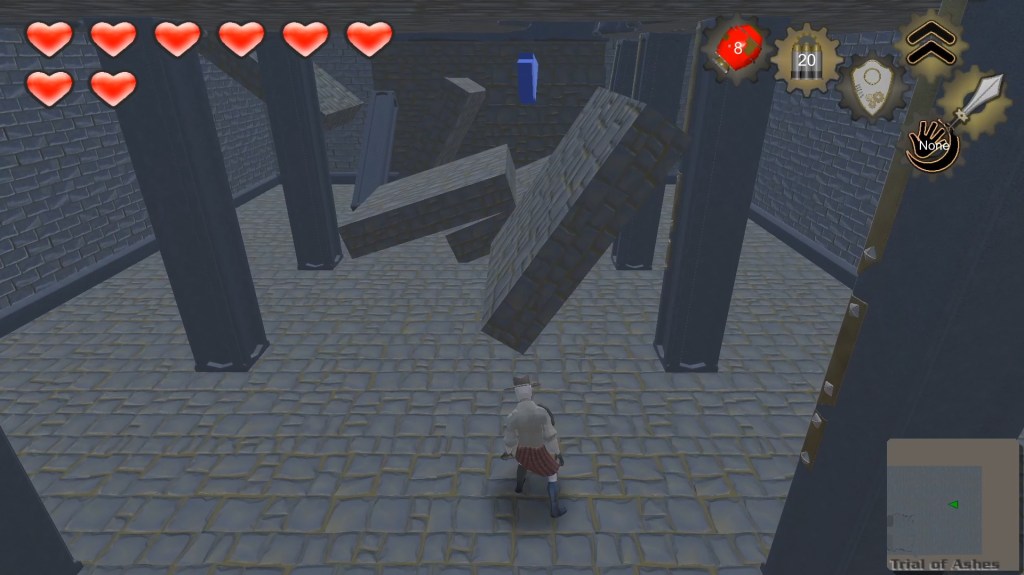
I wanted to start the player out right away with the impression of a fortress or castle that’s crumbling, so the first thing they see is a room with the ceiling collapsed. Jumping up the rubble leads them to a hallway.
After being stepped on, some tiles will collapse. They can be identified by their cracked surface before you step on them. Once stepped on they’ll begin to wobble and then sink, giving the player a few seconds to move and avoid damage.
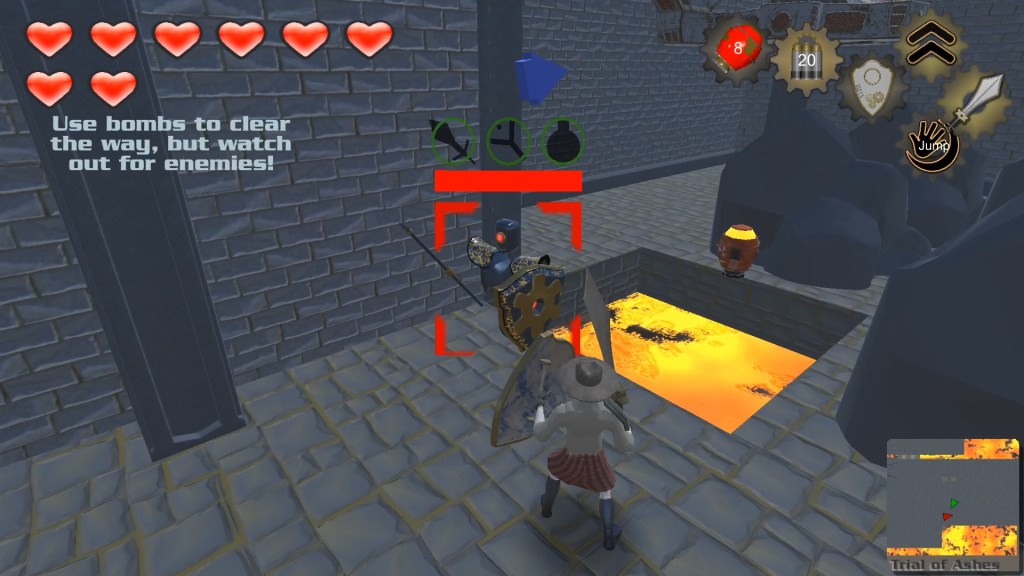
Throwing a bomb will destroy nearby boulders, giving the player space to move. But It can also expose them to additional danger!
Trial of Embers
My original concept for the level was to have complex moving floors, rooms that would split in half, and all sorts of really cool and dynamic movement. Unfortunately, there were some issues with the player model glitching through or falling off of objects that moved too dramatically.
I was able to fix this problem in the Unity Editor by creating a trigger collider on the moving ground that would make the player a child object while they stood on it. But this fix didn’t work in builds of the game, and I ended up having to tone down the movement of some rooms and platforms while removing others completely.
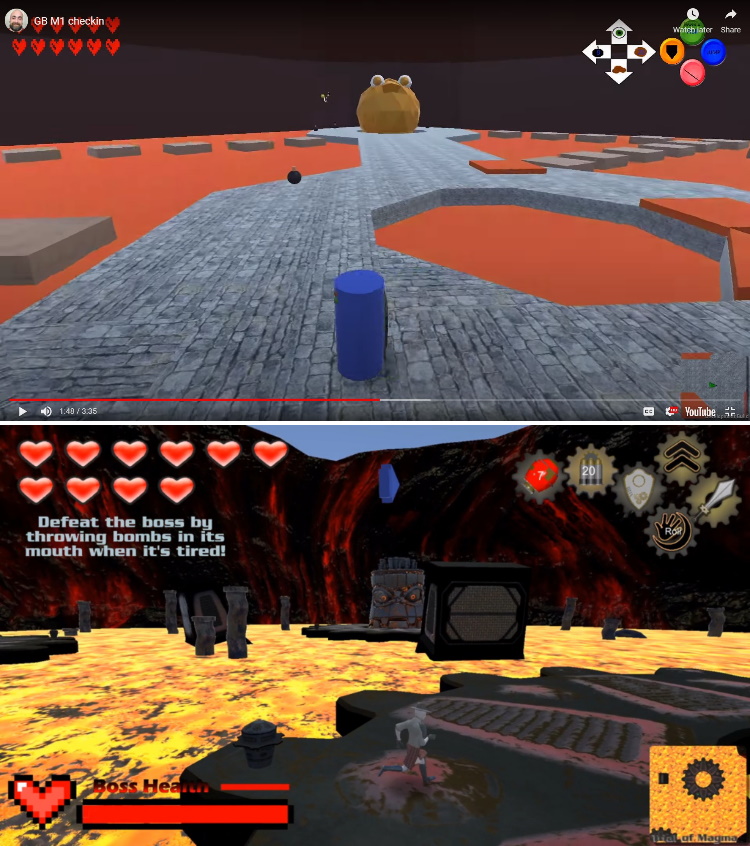
Trial of Magma
This level really is my pride and joy, it was so much fun to design The Great Mighty Lava (inspired by a similar boss from Conker’s Bad Fur Day) and Benjamin Portmann did an incredible job bringing my boss to life through his art skills.
The layout of the level is straightforward. Three platforms, each with a place for the boss to appear in the middle. Each pair of platforms has a rotating platform that can rise from the lava and will always rotate in toward the boss’s platform to act as funnels.
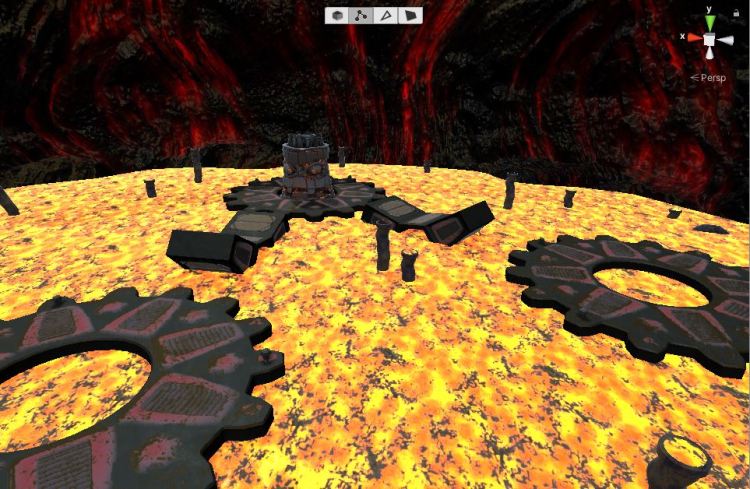
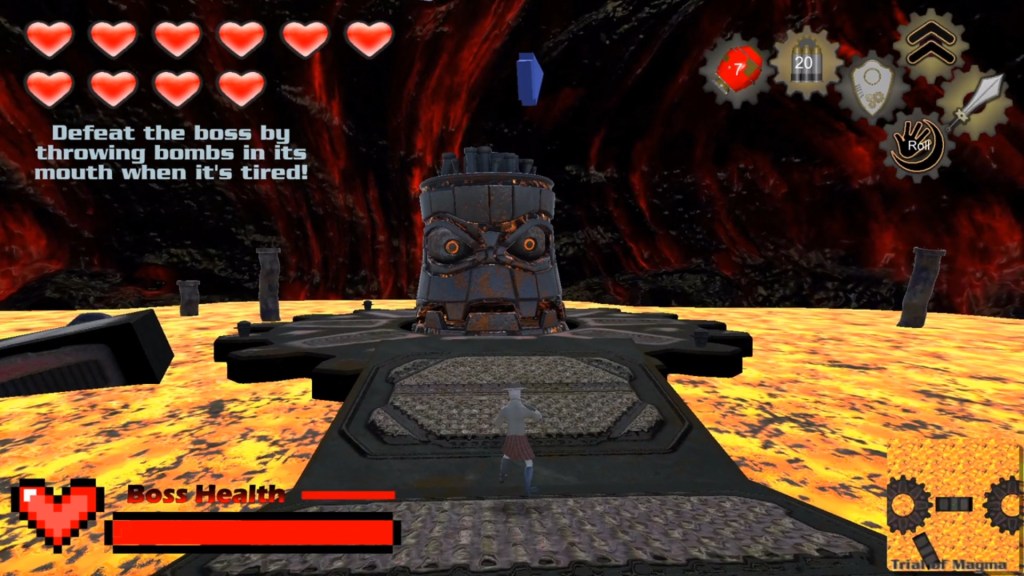
The boss will begin to hurl balls of lava at the player, while the player has to find an opportunity to jump onto the platform and reach the boss.
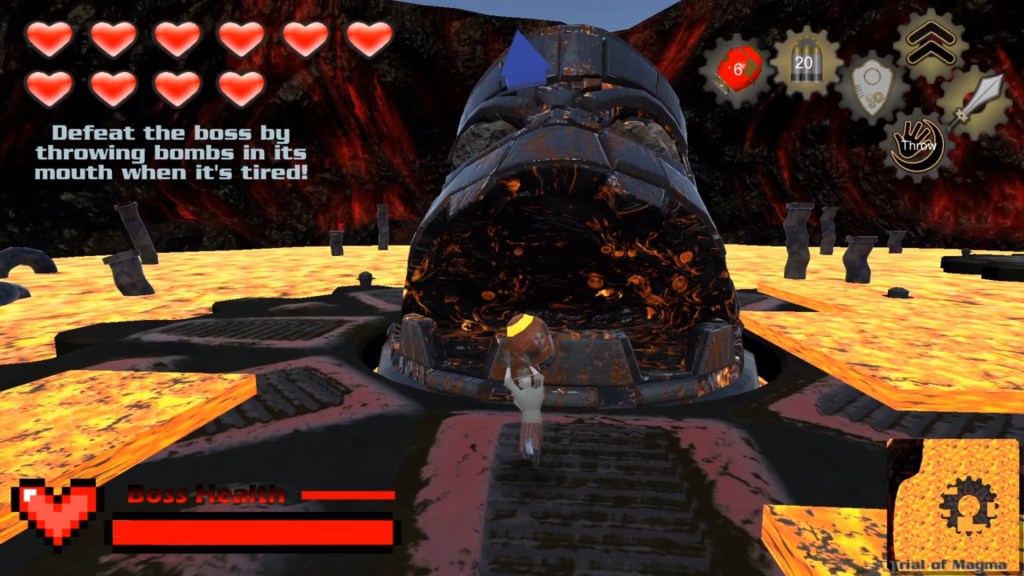
After a few volleys of attacks the boss will open its mouth, presenting the player with an opportunity to damage it by throwing a bomb into it’s mouth.
Please see under the Enemies heading for more information relating to the design and scripting of The Great Mighty Lava.
From Blockout to Finished Assets

Trial of Ash – What Changed?
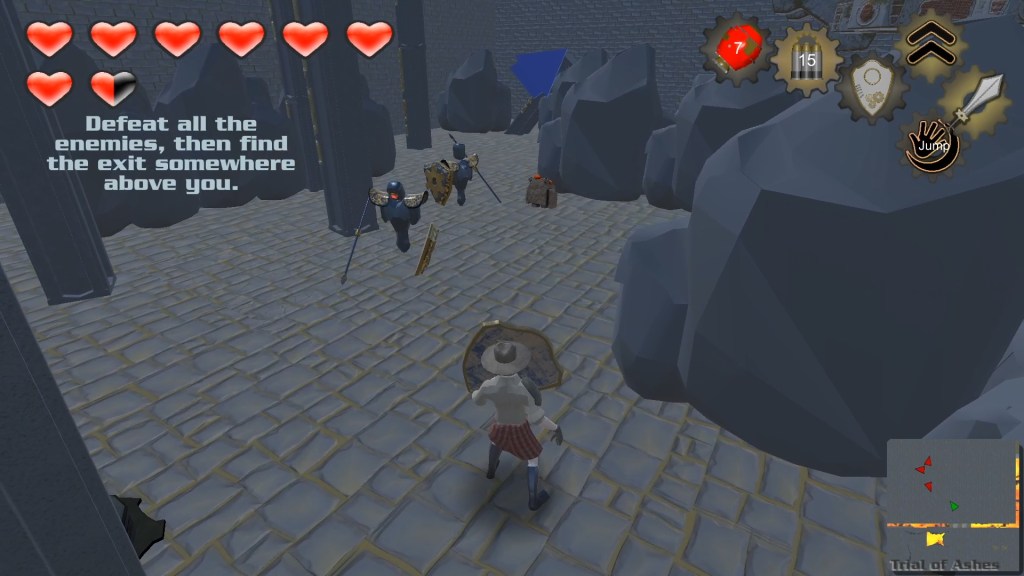
This second area in Trial of ash ended up becoming split into the second and third rooms. At first, I wanted the area to have a Bomberman feel to it, so I placed a large maze of boulders with pickups hidden throughout.
However, it wasn’t a very engaging setup. The area was big and unwieldy. More importantly, players just didn’t engage with the area much.
Because of that, I introduced trapped sections of floor that collapse, and an extra room between the entry and the maze. It gave players a chance to engage with breaking boulders as a way to clear space to fight in and better prepared them for the maze.
With the Maze as the third challenge of the level, I tightened the spaces to further incentivize breaking boulders and introduced a platforming challenge

Great Mighty Lava – What changed?
In its earliest iterations the level had 6 possible locations for the boss to appear, no giant gears, and extra pathways created from trapped floors.
The boss would attack and the closer the player was, the faster the attack would reach them. Once its attack pattern ended it would appear at a randomized location for its vulnerable animation.
This created a dynamic where the player would hang back from the attacking enemy, near the center of the map when possible.
In order to fix this:
- I shrunk the map to from 6 to 3 locations.
- Replaced the paths between them with giant rotating gears that require the player to time their jump and dash across.
- Reworked the Boss’s Lava Ball attack to have a set delay between from when the attack is launched until its impact regardless of its distance to the player.
Systems Design
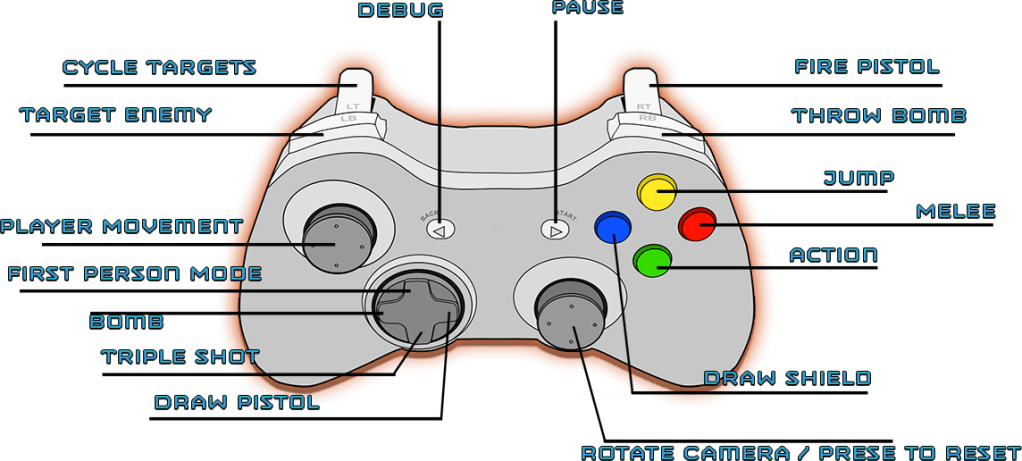
Player Abilities & Controls
I was the primary Systems Designer for Trial of passage, and although I definitely made a lot of mistakes, the end result was still workable. Even better, I learned a ton and have since been able to put my improved knowledge to good use on newer projects.
Here’s a quick video going over some of my contributions to the project.
Movement & Camera behavior
The very first hurdle to cross was developing the movement mechanics and camera behavior.
Goals: Overall, these goals were met relatively well – especially considering that it was my first time creating mechanics with this many moving parts and it was done pretty rapidly. (Huge shoutout to Brackey’s tutorial videos, without which I would have failed miserably. Although I did still have to modify them heavily to get the results I wanted, they gave me the foundation I needed to build from.)
- Create responsive ground movement controls, and a satisfying feeling jump/fall.
- Create a camera that automatically rotates to follow behind the player as they move, and can also be controlled manually.
- Create a lock-on system that can pick a visible enemy, smoothly cycle through selecting different enemies, and allows the player to attack and defend intuitively.
- Create a “highlight” camera that can be activated to show the player points of interest.
- Create a 1st person camera that can be used to aim ranged attacks – similar to Ocarina of Time.
What I learned:
- I think the biggest thing I learned was that it was a mistake to not use a state machine to handle the player’s current state – instead I used a bunch of separate variables. This resulted in a lot of if statements as we checked their current state to determine if an action was permitted.
- About halfway through the project we wanted to switch everything over to controllers from a mouse and keyboard, which couldn’t be done with Unity’s legacy input manager due to not reading button presses consistently between different controllers. I was able to migrate everything over to the newer input manager system, but it was time consuming and presented a bunch of bugs that needed fixed.
- When locked on to an enemy and extremely close to them, the camera can make some pretty aggressive movements to try and keep them in the field of view. They don’t feel great and can be pretty disorienting at times. The camera needed some limiters on its tilt, and probably some other fine tuning to get the lock-on view to feel better in these circumstances.
Enemies
Below are the enemies I was the primary designer for – I also want to take a moment to give a shout out to the art team, who created fantastic models for our enemies! Their portfolios are linked at the bottom of this page.
Flailer
Designed by Nicholas Fife
Model created by Ashely Coe
Animated by Nicholas Fife
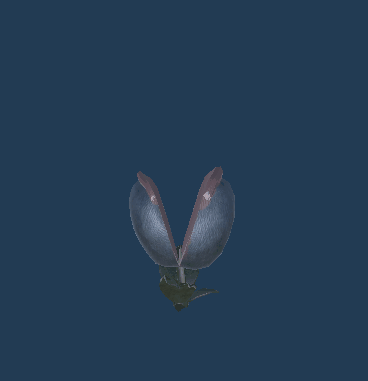
The Flailer was an enemy we created during our first sprint. It’s a stationary enemy modeled off of the Deku Baba enemies from Ocarina of Time. When the player gets close it will rise from the ground, indicating it’s entered an active state.

It’s behavior is extremely straightforward. Once its attack is ready, it’ll wiggle in place for about a second, and then spin around in a blockable attack.
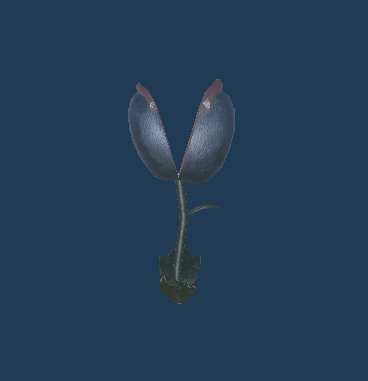
When damaged, it shrinks back down to the ground for a few moments before rising again.
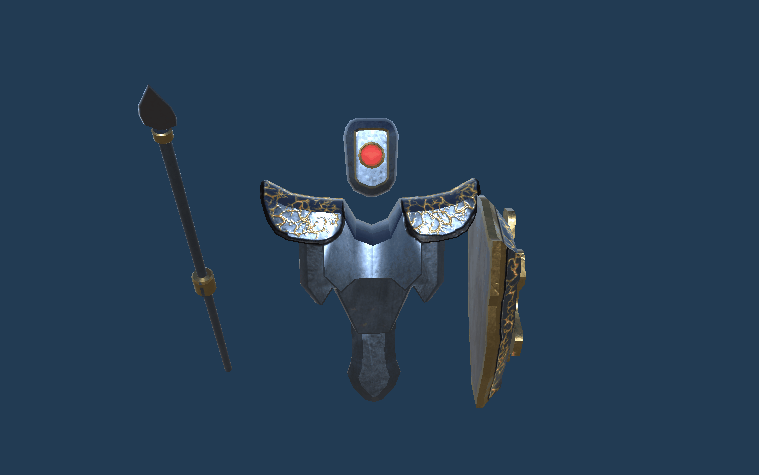
Blocker
Designed by Nicholas Fife
Model created by Ashely Coe
Animated by Nicholas Fife
This enemy was introduced to give the game a more give and take melee experience. It is equipped with a shield to block the player’s attacks, and a spear to give its attacks a bit of range.
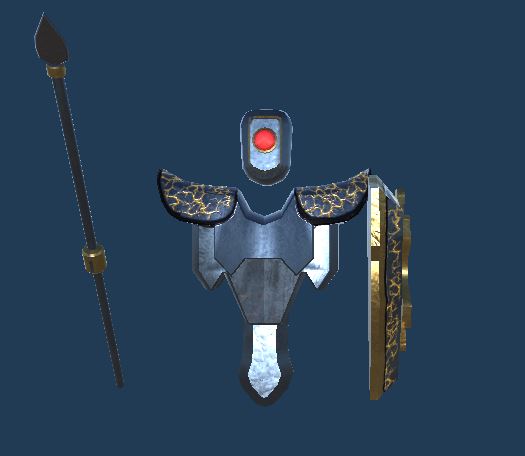
Upon noticing the player, it’ll raise its shield to block incoming attacks. The player can still damage it by throwing a bomb or shooting it in the head with their gun. Or they can wait until it drops its guard to attack.
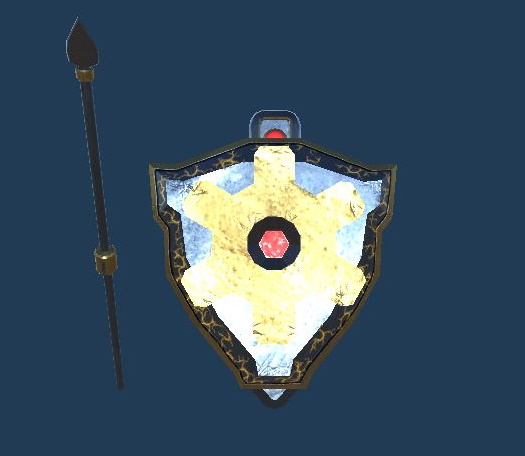
This primary attack is used about 75% of the time and can be blocked by the player or sidestepped and countered.
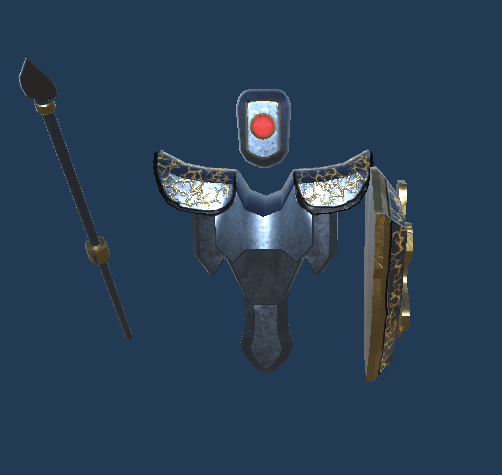
This secondary attack has a longer wind up, is unblockable, and deals twice the damage of their primary attack. The player may back up to avoid damage, or quickly attack to disrupt the attack before it is launched.
Great Mighty Lava
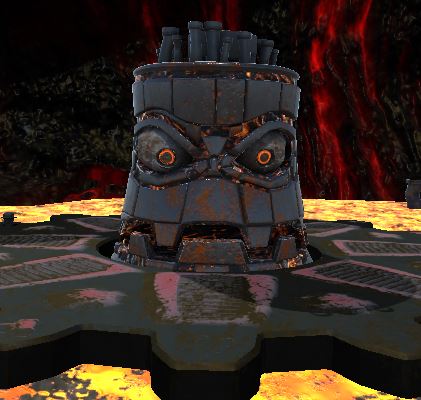
Designed by Nicholas Fife
Model created by Benjamin Portmann
Animated by Benjamin Portmann
This boss fight is probably my favorite game feature I’ve ever worked on. I wish I’d had time to add additional attacks and behaviors to this enemy, but still incredibly proud of what we ended up with given our time constraints.
The implementation of the boss is different from the other enemies, rather than being driven by the simple enemy state machine I’d created in C#, The Great Mighty Lava relies on its animation states and animation events to drive most of its behavior.
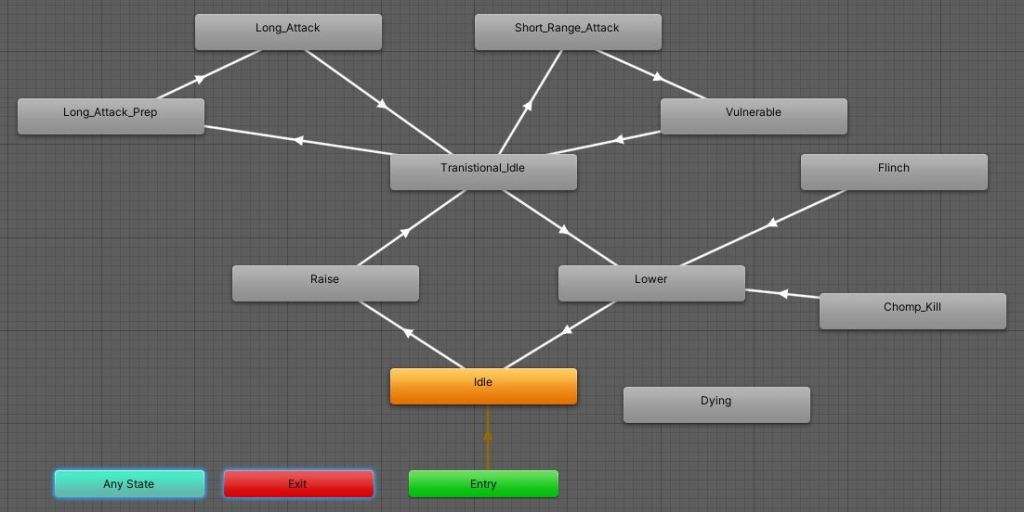
In this first showcase video I play through the boss fight and then hop over to the Unity Editor and show just a bit of how I have it all set up.
In this second video I actually start to get into how I have the boss’s code set up and explain some of the problems I had to solve as I was designing it.
Boss’s Lava Ball Attack
One of the most fun problems I had to solve was figuring out how to create a smoothly arcing projectile that will impact a pre-determined point after a pre-determined delay. Here’s how I magicked it into working without complex math equations!
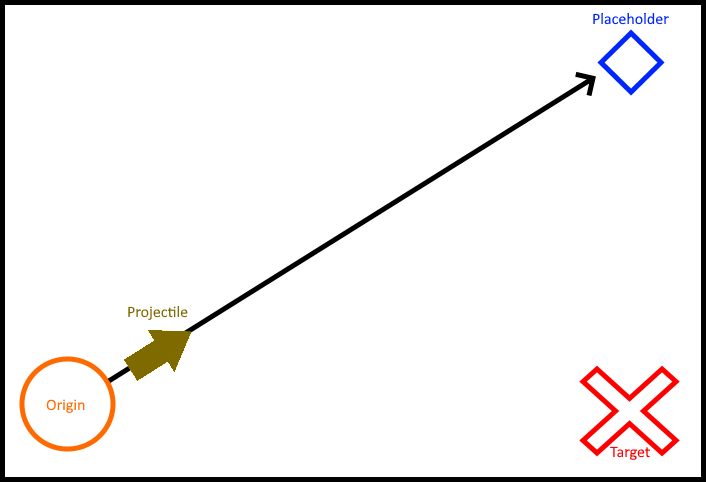
- When the lava ball is launched a placeholder target is created directly above the Target.
- A timer is used to generate a percentage representation of time elapsed divided by time to impact.
- Every frame that time elapsed percentage is generated and fed into a pair of Vector3.Lerp commands.
- The first uses the projectile’s original position and the placeholder’s current position to update the projectiles current position.
- The second uses the placeholder’s original position and the target position to update the placeholder’s current position.
- The net effect creates a close approximation to an arcing trajectory… right up until the end.
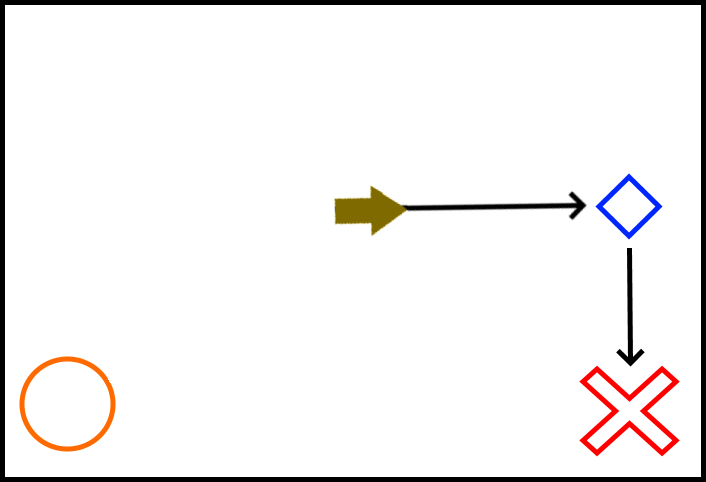
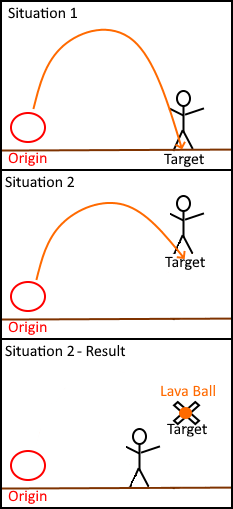
A Problem!
Under expected behavior, illustrated in Situation 1, the projectile will collide with the ground at the end of its trajectory even if the player is no longer there. This destroys the lava ball and spawns a pool of lava.
However, if the player is jumping like in Situation 2, the target position is in the air and you get some weird behavior with the lava ball getting stuck hovering in midair indefinitely!
Especially because this level requires frequent jumping, this was a pretty significant issue that needed fixing.
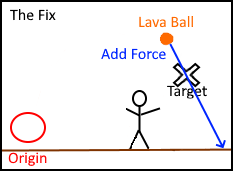
The Fix
Once the time ratio reaches 95% it no longer uses lerp to calculate its movement. Instead a trajectory is generated from it to the target position and force is added along that trajectory.
This new force works like a follow through, carrying the lava ball through its target position and making certain it reaches the ground regardless of its target position’s height.
Animation States
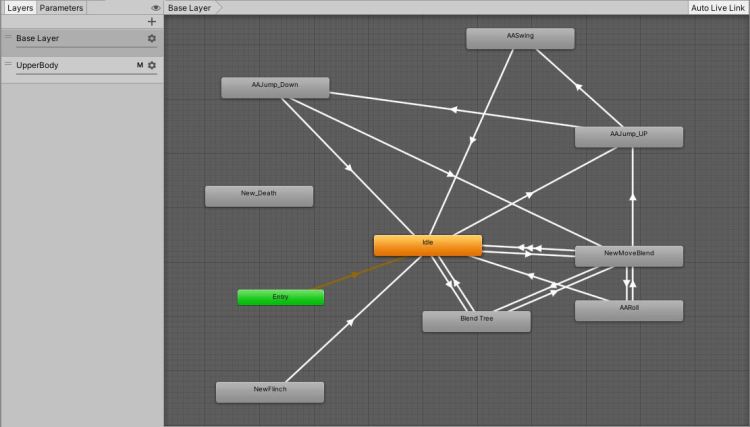
Getting the final animations set up was a bit of a rushed process; due to the structure of our class we didn’t receive the player animations until a few days before the project was due to be complete, and the artist assigned to these only had about a week to complete them.
To lower the number of unique animations, we used an upper and lower body animation layer to combine animations like walking with blocking.
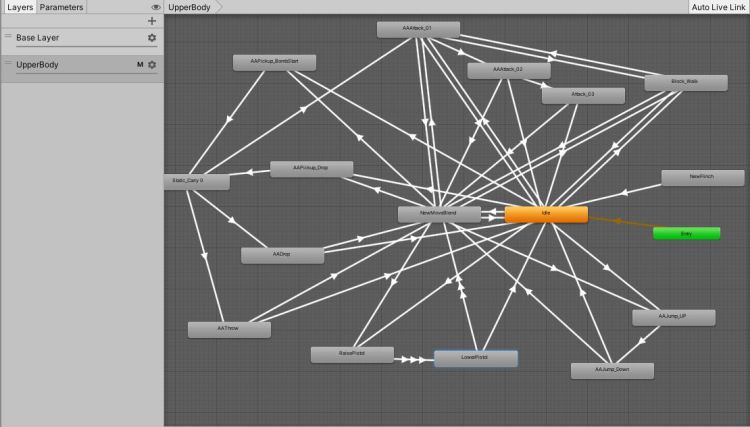
Overall, it works well but it was definitely a learning experience. On the UpperBody layer I have a separate idle animation and movement blendtree which causes it to look like a mess in the animator window, as you can see in the second picture.
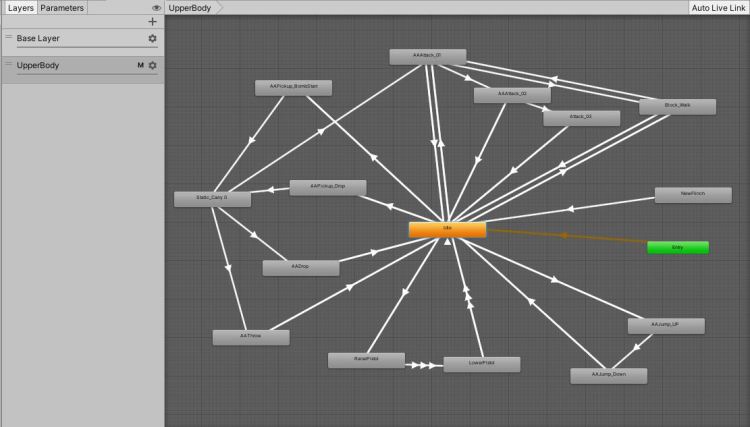
If I’d included the idle animation in the walking blendstate, my animation state machine would’ve looked like this instead.
Camera
One of the first issues I had to tackle was designing the game’s camera behavior. The work I’d done with cameras in the past was extremely simple, so these more complex behaviors presented some unique and fun challenges! (Read: I watched a BUNCH of different tutorials and experimented extensively to combine them.)
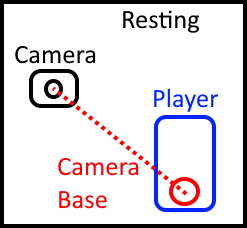
Camera Base & Follow
The Camera is set as the child of an empty game object that serves as a base that can be manipulated to move the camera.
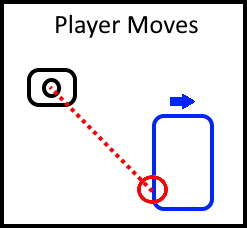
When the player moves, the camera stays focused on the camera base.
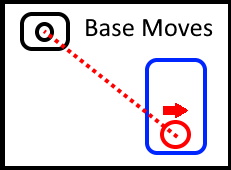
On the following frame, the camera base starts to follow the player by lerping between its current position and the player’s current position.
This subtle zooming out of the camera is great for creating a feeling of momentum.
Camera Distance
Each frame, the camera’s current position is used to create a normalized vector3 and that reference is multiplied by the maximum camera distance to create a reference to the camera’s preferred position in relation to its base. (This allows manipulation of the maximum distance for the lock-on camera mode.)
A linecast is sent starting at the camera base and going to the camera’s preferred position. As long as no obstacles are detected the camera will remain at its maximum follow distance.
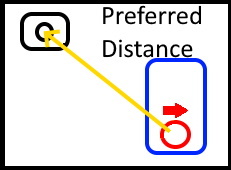
If an obstruction is detected, it will measure the distance from the base to the obstruction and multiply it by .9 to determine what the actual distance between base and camera should be.
It will then multiply the normalized vector3 by the newly determined follow distance to determine what the camera’s new position should be.
Additional smoothing of this position isn’t necessary so no lerp or smoothdamp is used to soften the movement.

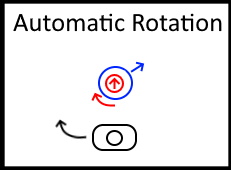
Camera Rotate
Anytime the player is moving, the camera base will slowly rotate to try and match the player’s Y rotation using Quaternion.Lerp.
Additionally, the player is given direct control over the X and Y rotation of the camera base through the analog stick. Allowing them to look up, down, left, and right freely.
Camera Perspectives
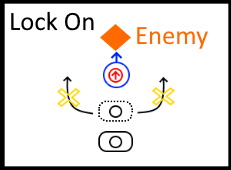
Lock On:
- Maximum distance between camera and base is shortened.
- Player rotation is snapped to directly face the targeted enemy.
- Base rotation is set to player rotation, snapping the camera to directly behind the player and centering the targeted enemy
- The camera no longer rotates with player input, remaining centered on the enemy at all times.
- Player can still move, however now instead of turning with sideways input they’ll circle the targeted enemy.
- While in this locked on state, some of the player’s buttons function differently. For example: pressing the gun button will allow the player to automatically fire directly at the enemy’s center mass without the need for manual aiming.
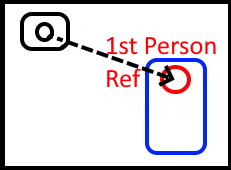
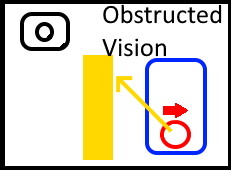
First Person:
- The Player Avatar has a child object that serves as a reference to the 1st person camera position.
- Upon Entering 1st person mode, the Camera Distance and Camera Rotate scripts are disabled and the camera position is set to that of the reference position.
- All Renderers displaying the player avatar’s body are disabled so vision isn’t obstructed.
- Camera Follow remains active and continues to update the camera position.
- The player is given direct control of the camera’s X and Y rotation so they can look around.
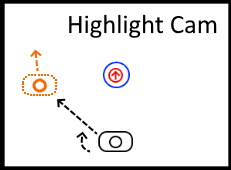
Highlight Cam:
- When this mode is triggered, the camera is supplied a new position and rotation to move to.
- It will immediately save a reference to its current position and rotation and then smoothly move to match the placement it was given.
- After a timer elapses the camera will snap back to its original position and rotation.
What I learned about cameras:
Generally speaking, I probably learned the most about manipulating objects relationally in a 3d environment than the actual camera component in Unity. It was thanks to my work with the camera system that I was able to figure out how to get all sorts of other behaviors working in other parts of the game. A great example is the arcing projectile attack I talked about under the Great Mighty Lava heading.
Speaking from a coding perspective I learned a lot about the importance of well-designed state machines to keep behavior in sync. The Camera Perspectives script is written a lot more like a mad scientist throwing switches maniacally than the smoothly functioning machine I eventually managed to rig it into functioning as. If I had used a dictionary to link camera modes to actions and restructured the conditional statements behind everything I could’ve had a much shorter and well organized script.
Agile Development
This project was completed in a series of 8 Agile sprints, each planned as a team and with shared responsibility for completing all promised features. I’ve highlighted the features or parts of features that are my work.
Play the Game!
I’ve included a download link for a zipped copy of the game below! It was playtested using a USB cable to connect either an Xbox One or PS4 controller to a PC. Unfortunately Mouse & Keyboard Support was never developed during the project.
Please note that due to the age of the project, it appears to not work with Windows 11. However Windows 10 still works as of the last time I’ve tested it.
Team Credits
Nicholas Fife (Game Designer)
Brad Thompson (Game Designer)
Teddy Koniarz (Game Designer)
Benjamin Portmann (Game Artist)
